
Easy Tissue Paper Suncatchers for Kids (Bright & Simple Window Craft)

(This post contains affiliate links. If you click on a link and make a purchase, I may receive a small commission at no extra cost to you)
If you’re looking for a simple, low-prep craft that adds a splash of colour to your home, these easy tissue paper suncatchers are perfect. We made ours over the weekend using just a few basic materials, and they’ve completely brightened up our window—even on a cloudy day!
This is a great activity for children of all ages and works beautifully as a spring craft, summer activity, or just a fun way to spend a quiet afternoon at home.
🌈 What Are Suncatchers?
Suncatchers are decorative designs that stick to windows and catch the light, creating a stained-glass effect. When the sunlight shines through the tissue paper, it really brings the colours to life.
They’re simple to make but look so effective—especially when displayed together like a little window garden!
✂️ Materials You’ll Need
- Coloured cardboard (for the frames/shapes)
- Clear sticky tape (or contact paper)
- Coloured tissue paper – we used this one that already comes in small squares.
- Scissors
- Pencil (for drawing your shapes)
Optional: black marker for outlining, string if you want to hang them instead
🖌️ How to Make These Easy Tissue Paper Suncatchers
1. Draw and Cut Your Shapes
Start by drawing your designs onto coloured cardboard. We made:
- A sunshine
- Flowers
- A little bee
Cut out the shapes, then carefully cut out the centre to create a frame.
2. Add the Sticky Layer
Turn your shape over and cover the open section with clear sticky tape. This will act as the base for your tissue paper. Trim off any excess tape.
Tip: If you have contact paper, this works even better and is easier for younger children.
3. Decorate with Tissue Paper
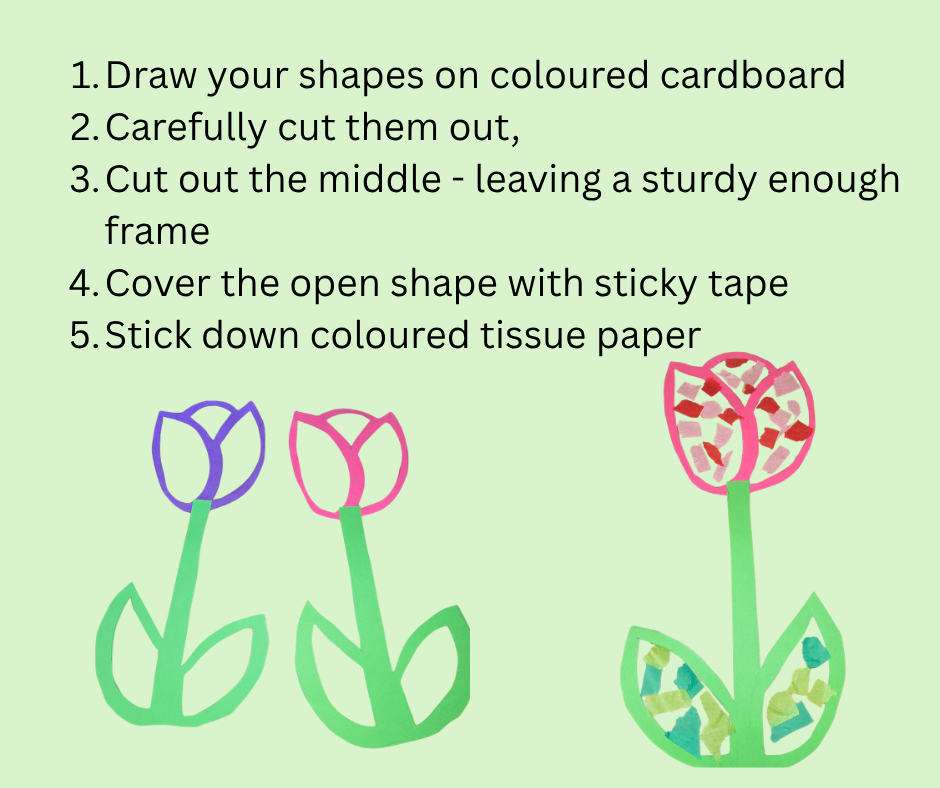
Stick small pieces of coloured tissue paper onto the sticky surface. Overlapping the colours creates a lovely stained-glass effect.
Let children get creative here—there’s no right or wrong way to do it!
4. Seal the Back
Once you’re happy with the design, add another layer of sticky tape over the top to seal everything in place.
Alternatively you can leave small sections of tape exposed and stick your design directly to the window without sealing it.
5. Display on a Window
Stick your finished suncatchers onto a window and watch them glow when the light shines through.

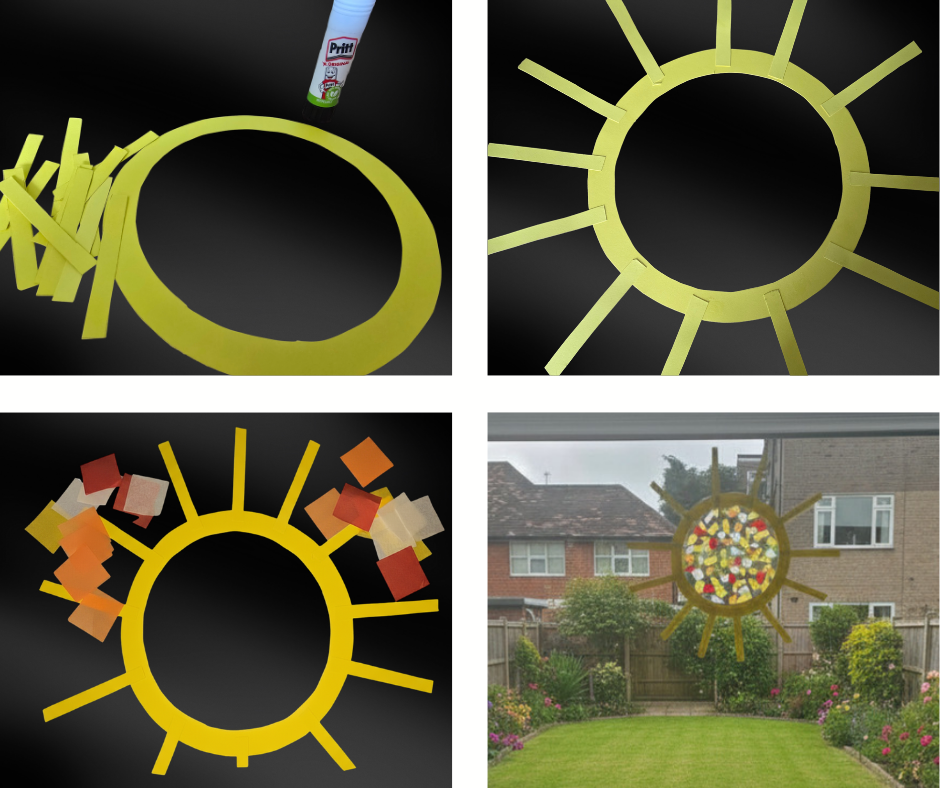
🌞How we made the sunshine
To make the sunshine, simply trace around a plate on your coloured cardboard. If you have a slightly smaller plate, use that to trace the inner circle. Cut out the frame. The rays are 1cm wide by 8cm long although you may want to vary that depending on the size of your sun. Simply cut enough rays and glue them to the frame of the sun.
The rest is exactly the same as before, cover the inside of the sunshine with sticky tape, add your tissue paper and done!
🌼 Why This Craft Is Great for Kids
- Encourages creativity and colour exploration
- Helps develop fine motor skills
- Quick and easy with minimal prep
- Suitable for a wide range of ages
Plus, you end up with something really cheerful to display!
💡 Tips & Variations
- Try seasonal themes (hearts for Valentine’s Day, pumpkins for autumn, stars for winter)
- Use black card for a more “stained glass” look
- Create a full window scene (like our little garden with flowers and a bee!)
- Add glitter tissue paper for extra sparkle
🏡 A Simple Way to Brighten Your Home
This is one of those crafts that looks far more impressive than the effort involved. It’s perfect for a rainy day, a weekend activity, or even a playdate idea.
And the best part? Every time you walk past the window, you get a little burst of colour and creativity.
🎨Looking for more crafts?
If you have enjoyed this craft and would like to try your hands on some more, why not check out our other easy craft ideas?
- Dinosaur Masks
- Paper Plate Storytelling craft
- Make your own Stickers
- DIY Jam Jar Tealight holders
- Make your own photo frames
Don’t forget to sign up to our newsletter if you want to be kept informed on any new crafting and kids activities.
If you try this craft, I’d love to see what you make—tag me or share your creations!